Showing posts with label cake. Show all posts

Tuesday, March 27, 2012

Springtime = Caketime

With the exception of the past two days, we've been blessed with gorgeous spring weather recently! Taking that into consideration, I used the spring as a theme in a recent cake I made for a school celebration. The cake was my favourite chocolate cake, the recipe for which you can find here, or on the recipes page with several of my other faves!

What I really wanted to talk about was how simple it was to make this cake, though some of the details look quite intricate. What you'll take away from this post is not only a simple way to make pretty cakes, but also that I'm a bit lazy (well, not lazy per se, but I sure wouldn't take the time to craft each flower on my own).

To start, I covered the cake in chocolate buttercream, and the followed that with a layer of fondant. This was a simple marshmallow fondant made from green mini-marshmallows.

Next, I divided gum paste into three sections, colouring them blue, pink, and brown respectively. I've come to find that gum paste is much nicer to work with than fondant, so I chose it for the decorations as opposed to the fondant that I'd usually used previously.

Now, here's the real trick - gum paste molds. They are quite possibly the easiest thing to use, honestly. There are several different Wilton ones to choose from, and I chose a spring themed one. Simply dust the molds with corn starch (I'm sure icing sugar would work well too) and then push the gum paste into the molds. Carefully remove the gum paste and trim any areas that may need trimming. Voila, easy peasy.

To attach the gum paste, I used a small brush and sum water but you can of course use gum glue. Once the pieces were attached, I painted sugar dust onto the flowers for some extra dimension. The cake was a hit, and I think (despite my protest that it was much easier than it looked) I was given much more credit than necessary for this quick little cake. It really does look like spring in a cake though, and tasted alright too!

For more updates, ideas, and general cake banter subscribe to the blog or visit the Facebook, Twitter, and YouTube pages! Until next time!

Tuesday, March 13, 2012

Maple Chocolate Chip Cupcakes

I don't know about you, but I love this time of year - the sun is shining, the temperature is rising, cupcakes in the oven, and spring is on its way. In my family this means one thing - syrup season. As I have cousins who have a sugar bush, I've grown up knowing that this time of year means fresh,  pure maple syrup. In honour of this marvelous time of year, I decided to make maple cupcakes.

I'd never made (or even tried) maple cupcakes before this experience, so I wasn't sure what to expect. Don't get me wrong, I do love maple syrup but thus far I'd only had it with pancakes, waffles and so on, but never in cake. I found a recipe in The Cupcake Diaries, however, and it seemed fitting for a first attempt. The recipe was for maple chocolate chip cupcakes, which you can find here. It also suggested a chocolate ganache frosting, however I didn't have any heavy cream and opted for the maple cream cheese icing instead.

I knew while they were baking that the cupcakes were going to be good, as there was an incredible scent filling the kitchen as they were nearing the end of their baking time (which I found to be a little longer than the recipe indicated - about 21 minutes rather than 18-20). Wanting to get the full experience of the cupcakes, I tried on before they were iced just to experience the cake on its own. The maple syrup ensured that the cupcakes stayed extremely moist while baking, and provided a delicious flavour.

Next was the icing. It was a basic cream cheese recipe (which you can find here) but had an added 1/4 cup of maple syrup. While it was a nice icing, it was extremely sweet. And when I say extremely, I mean it. It was basically a sugar coma in the making, but tasty nonetheless. And cake is cake, so who am I to complain? I do think I'll make sure to have heavy cream on hand next time though to try them with the ganache frosting instead.

Tuesday, March 6, 2012

Cake Pops How-To

Recently, I was asked to make cake pops for a child's 6th birthday. Never having made cake pops before, I took on the request though I didn't make any promises for success. The procedure is pretty straightforward but it's a finicky process. A finicky process that I'd like to share with you.

To make the cake pops you will need: cake and icing of your choice, sticks for the cake pops, candy melts and sprinkles/decorations to decorate as desired

1. The first thing you'll need to do is bake a cake. I used a basic chocolate cake, and chocolate icing for the cake pops. 

2. Once the cake is cooled, crumble it up into a large bowl, and add a few cups of icing (you may want more depending on how much cake you have - you'll be able to judge an appropriate amount), combining the two thoroughly until the mixture can be shaped into balls.

3. Once you've reached the desired consistency, shape the mixture into balls, and position them on a tray, cookie sheet, or other flat surface that will fit in a fridge or freezer. I used a cookie sheet lined with parchment paper.

4. Allow the balls to cool in the refrigerator overnight or in the freezer for a couple hours until they are chilled through and hard.

5. Melt the candy in a microwave-safe bowl or over a double boiler. Dip the sticks in the melted candy and then insert them into the chilled cake balls. Allow the sticks to sit for a couple seconds so that the candy hardens.

6. Coat the cake pops in the melted candy. At this point, you'll want to decorate them (if you're choosing to do so). I used candies to make eyes, faces, etc. You'll want to be careful here. The candy melts, while still wet, will run off the cake pops to some extent and your decorations could run off. However, the candy melts harden quickly, so waiting too long will make it impossible to attach the decorations to the pops.

7. Once the cake pops are dressed to your liking, allow the candy melts to harden completely, and enjoy. While the candy melts were hardening, I used a strainer so that any candy that dripped off had something to drip into, and the holes in the strainer were a good size to hold the pops apart from each other while they were drying.

The cake pops turned out alright. They were not nearly as pretty as I would have liked, however there is something of a learning curve when it comes to getting them to look nice. Until I've mastered the art of decorating them though, I'm just going to say they're supposed to be alien cake pops. And now, you know how to make them too! 

Red Velvet Cupcakes


So far, this has proven to be the best Red Velvet recipe I've used. Ones with less cocoa tend to be a bit more bland (the Cake Boss recipe only calls for 1tbsp of cocoa), so these were perfect. They also stayed nice and moist. I did have to make a special grocery store trip to buy apple cider vinegar though, as it wasn't something we had in the pantry to that point in time. The Cupcake Diaries says this recipe makes 12 cupcakes, but it actually yields about 24.

3 1/4 cups all purpose flour
1 tsp salt
12 tbsp unsalted butter, at room temperature
1 3/4 cups sugar
2 large, room temperature eggs
4 tbsp red food colour (no-taste liquid food colour - no taste is important because it can give off a slightly bitter taste otherwise)
1 tsp pure vanilla extract
2 1/2 tbsp cocoa powder, sifted
1 1/2 cups whole milk, at room temperature
1 1/2 tsp baking soda
1 1/2 tsp apple cider vinegar

Preheat the oven to 350F and line standard cupcakes pans with baking cups or grease pans. Sift together flour and salt and set aside. In stand mixer bowl, cream together the butter and sugar at medium speed until light and fluffy (3-5 minutes). Add the eggs one at a time, mixing slowly after each addition.
In a separate bowl, using a whisk, whisk together the food colour, vanilla, and cocoa powder and then slowly add the mixture to the mixer bowl, mixing slowly until well mixed. Add flour and milk alternately in thirds, scraping the bowl as needed and mixing until incorporated.
In a small bowl, add baking soda to the apple cider vinegar, mix thoroughly (you will see them react to one another) and then add the mixture to the batter and mix only until just incorporated.
Fill each muffin well until it is 2/3 full and then bake for 16-18 minutes (I found that these took closer to 20 minutes, but it will vary with each oven, whether it is convection or not, how full muffin wells are, etc.)

Cream Cheese Frosting

The cream cheese frosting I used for the filled Red Velvet cupcakes came from Cupcake Diaries, although I used more vanilla than the recipe suggested. I also used this recipe with the Maple Chocolate Chip Cupcakes by adding 1/4 cup maple syrup to the mixture.

4 tbsp butter (1/4 cup)
6 oz cream cheese (3/4 brick of cream cheese)
4 cups icing sugar
1/4 tsp vanilla (I use about 1 tsp)
1/4 cup maple syrup (if making maple cream cheese frosting)

Beat all of the ingredients together in a stand mixer until well combined and smooth. I like to beat my icing on high for a couple of minutes once everything is combined to make the icing lighter (unless I'm covering it with fondant or something where it's going to be flattened anyway).

Favourite Chocolate Cake


I originally found the recipe for this cake on the Wilton website, and it has easily become one of my absolute favourite cakes, and by far my favourite chocolate cake. It stays really moist and tastes great with butter cream icing (vanilla or chocolate). A word of warning though, the chocolate chips can cause the cake to stick to the bottom of the pan. This can be avoided by putting the chocolate chips in a few minutes after the cake has been in the oven so that they don't sink right to the bottom.

2 cups semi-sweet chocolate chips, divided into 1 cup portions
3/4 cup butter
1 1/2 cups granulated sugar
3 eggs
2 tsp vanilla extract
2 1/2 cups all purpose flour
1 tsp baking soda
1/2 tsp salt
1 1/2 cups water

Preheat the oven to 350 degrees, and prepare your pans by flouring them, lining them with parchment, or spraying them with a non-stick spray.
In a microwave safe bowl, or on the stove in a double boiler, melt 1 cup of chocolate chips with the butter until completely melted. Pour chocolate into a larger bowl and add the sugar, beating at a low speed until the sugar is well blended. Add the eggs, one at a time, and then the vanilla. Once everything is well combined, add 1/2 cup flour, the baking soda, and salt. Mix well, and then continue to add the remaining 2 cups of flour and the water. I find at this stage that its helpful to alternate between the two in small amounts as it reduces the flour that flies everywhere. Stir in the remaining chocolate chips and pour the batter into prepared pans.
Bake for 35-40 minutes (depending on your oven, and the size of the pans used). When a tooth pick comes out clean, the cake is ready. Allow it to cool for 10 minutes in the pan, before removing and allowing it to cool completely on a rack.

Basic Butter Cream Recipe

This is the icing I use for the majority of my decorating. In fact, I've used it so often that I've got it memorized now. The amount of milk needed will vary depending on the consistency of icing you're looking for. 

3/4 cup vegetable shortening
3/4 cup butter, softened
2 tsp vanilla
6 cups icing sugar
1/4 - 1/3 cup milk

Cream the shortening and butter together until they're well blended and have achieved a light, creamy texture. Add in the vanilla and beat at a medium speed until well mixed. Add the icing sugar, stopping often to scrape the sides of the bowl with a spatula. Once the icing sugar has been added, the icing will be stiff and dry. Add the milk, a tablespoon at a time, continuing to beat at medium speed. When you have achieved the desired consistency, your icing is ready to use.
For chocolate butter cream, add 4 squares of unsweetened baker's chocolate.

Thursday, February 16, 2012

Soccer Jersey Chocolate Cake

So, about that other cake I made at the end of last week. A few weeks back, a good friend, Mariana (check out her fantastic blog, Gift Favours Under $5), asked me to make a birthday cake featuring the Stoke On The Trent football team's jersey and logo.

This seemed like an easy enough challenge although I was pretty nervous about making a cake for someone outside my family. This was the first time that failure would not be an option and I was feeling the pressure, and for good reason.

I used my favorite chocolate cake recipe for this cake, and it turned out quite nicely except that the chocolate chips in it stuck to the bottom of the pan and it broke coming out. Broke only slightly, but broke nonetheless.

I managed to save the situation by using that broken side of the cake to trim in order to make the sleeves. Crisis averted. For the time being.

Next, my chocolate butter cream was too thick and wouldn't go on smoothly, so I had to thin it out so that I could have a smooth surface.

Next, my fondant was drying out a quite a rapid pace (quicker than usual) and would not cooperate. As if it needed to be more problematic when I'd already fought tooth and nail to get it red.

Finally, I was doing a shell border around the edge of the cake and ran out of white icing with about 3 inches to go and had to make more for that tiny length. By the time I was finished, it looked like a bomb had gone off in my kitchen, with chocolate icing in one corner, vanilla butter cream in another, and the counter covered in scraps of fondant. It took an hour (with the help of my lovely mother) to clean up the mess of icing sugar, fondant, and butter cream that coated just about every surface.

Needless to say, when it was all said and done I was less than satisfied with the results of this cake. Perhaps that was just due to my frustration, I can't be sure. I guess it's true that we are our own harshest critics. Although, I did use gum paste for the first time when making the crest and I can honestly say that I quite enjoyed using it. It's much easier to work with than fondant.

Monday, February 13, 2012

Hello Kitty Cake

Hi there friends! I hope you all had a fantastic weekend/Valentine's Day (if you've already celebrated it). Maybe you tried out those DIY heart-shaped cupcakes (if so, how did they turn out?).

If your weekend was anything like mine though, it was a whirlwind and flew by without there being enough time. Last week, I had even less time than I did over the weekend, because I took on two cakes in addition to everything else.

The first of these cakes was a Hello Kitty cake that my aunt and uncle requested for my cousin's 5th birthday. It was pretty straight forward - use the Hello Kitty pan to bake the cake and then ice it.
This process went quite smoothly. I used a vanilla cake recipe from Baking With The Cake Boss, and my basic butter cream recipe that I've come to know by heart.

There weren't any problems with this cake (though it did take about 1.5 times longer to bake than the recipe indicated because of the depth of the pan) but I feel the need to let you all in on a secret.

Ready for it?

Using a 16 Star Tip to ice the entire cake takes forever. I honestly spent over two hours just piping the white onto the majority of the cake.

In the end though, I was pretty satisfied with the results. It's not too often (yet) that I get to say that so I'll call this cake a success. Also, though I didn't get a chance to try out the cake, I was told that the recipe was a hit!

Check back in a couple days to hear about my less successful cake encounter that also took place last week!

Thursday, February 9, 2012

Valentine's Day Red Velvet Cupcakes

Happy Valentine's Day to all the lovebirds reading this today! I wanted to share with you today some quick and easy heart-shaped cupcakes to celebrate Valentine's Day.

After seeing a photo on Pinterest, I improvised a method to do the same thing as there was no corresponding link to instructions. So, I've created a little how-to for you, based on how I accomplished these cupcakes, so that you can make something special for your special someone.

You will need:

  • Your favourite cake/cupcake batter, and icing
  • A regular muffin pan
  • Muffin pan liners
  • Marbles or glass rocks, or other heat-proof round objects
  • Sprinkles, candies, sugar dust, etc. to decorate
From what I could tell in the photo on Pinterest, they used marbles. I didn't have marbles so I improvised with decorative glass stones. I also used a Red Velvet cake recipe from Baking With The Cake Boss (I've still yet to watch his show), as well as a Cream Cheese Icing from the book. Once you've got your batter prepared, this is what you'll want to do:
  1. Line muffin pan with liners (I used Valentine's Day themed liners)
  2. Fill each liner with your cake batter (using something like an ice-cream scoop will help alleviate any mess and ensure that the cupcakes are roughly the same size)
  3. Using your index finger, push the liner towards the centre of the muffin hole
  4. Fill the resulting space with marbles or other objects to hold the liner in place (you'll want to stack a few on top of each other, so that the batter doesn't bake over top of the marble)
  5. Bake cupcakes according to recipe directions
  6. Let cupcakes cool, and remove from pan - be careful, the marbles may still be warm
  7. Allow cupcakes to cool completely and ice as desired
When icing my cupcakes, I chose to decorate them with red and white sugar sprinkles, heart-shaped candy sprinkles, and silver sugar dust. I used Valentine's Day themed cookie cutters on top of the cupcakes and filled the cookie cutter in with the dust (or sprinkles in some cases) to leave the decorations in the shapes of hearts, flowers, bells, etc. 
These were quick and easy, without the cost of purchasing a heart-shaped pan, or the need to elaborately decorate a cake! You get delicious results, and more time to spend with loved ones! 

On a side note - the Red Velvet cupcakes stayed nice and moist, and tasted pretty good, however the recipe only calls for 1tbsp of cocoa powder. I found that this left them a bit bland, as red velvet is supposed to have that cocoa taste. I'll be using my old recipe next time!

Tuesday, January 24, 2012

Barbie Doll Birthday Cake

One of my best friends and I have known each other since grade 9, and have been through boyfriends, drama, high school, and even university together. In fact, we were roommates for two years. I'd do anything for this gal, and this year for her 22nd birthday, which just passed, what she wanted was a cake. There is a bakery in our home town called Hank's Pastries that makes a dutch cake, which is a sponge cake with vanilla custard filling and butter cream icing. This is the cake that Alisha wanted, and who am I to deny my bestie?
This was the perfect chance for me to use a cake pan I'd been itching to try - the Wonder Mold pan. I had wanted to try it but had no reason to buy it - until now. I knew she'd like it, even if it was a cake more geared towards a 6 year old. Once I bought the pan, and had figured out what the cake would look like, the next, and far more pressing issue, was figuring out a recipe to use. I searched the internet to find recipes that sounded similar to the Dutch cake the Alisha had requested, and even made a practice sponge cake for her to try to make sure I was on the right track.
This has to have been one of the smoothest projects I've done to date. The cake cooked nicely, my custard filling turned out, and the cake decorating even worked out pretty well.
Something to note - the deeper pans require longer cooking times, however you need to keep an eye on the cake and make sure that the top doesn't burn! With it being exposed to the heat so much longer, pay attention that it doesn't get darker than its supposed to.
Once the cake was made, I formed cylinders out of fondant to form the ripples under the skirt of the dress, before laying the pink fondant over the top. There were a few problem areas around the base of the cake because of the ruffles, but they were easily concealed with darker pink fondant ribbon. I also used a star tip to embellish the dress.
The trickiest part of this whole thing may have been attaching the bodice of the dress to the doll. It took me a few tries, but it stayed in place eventually. I love when these things work out!
When the time came to give her the cake, we spent the day cozied under blankets having a Harry Potter marathon and eating cake. Doesn't get much better.

Tuesday, January 17, 2012

Birthday-Bow Cake

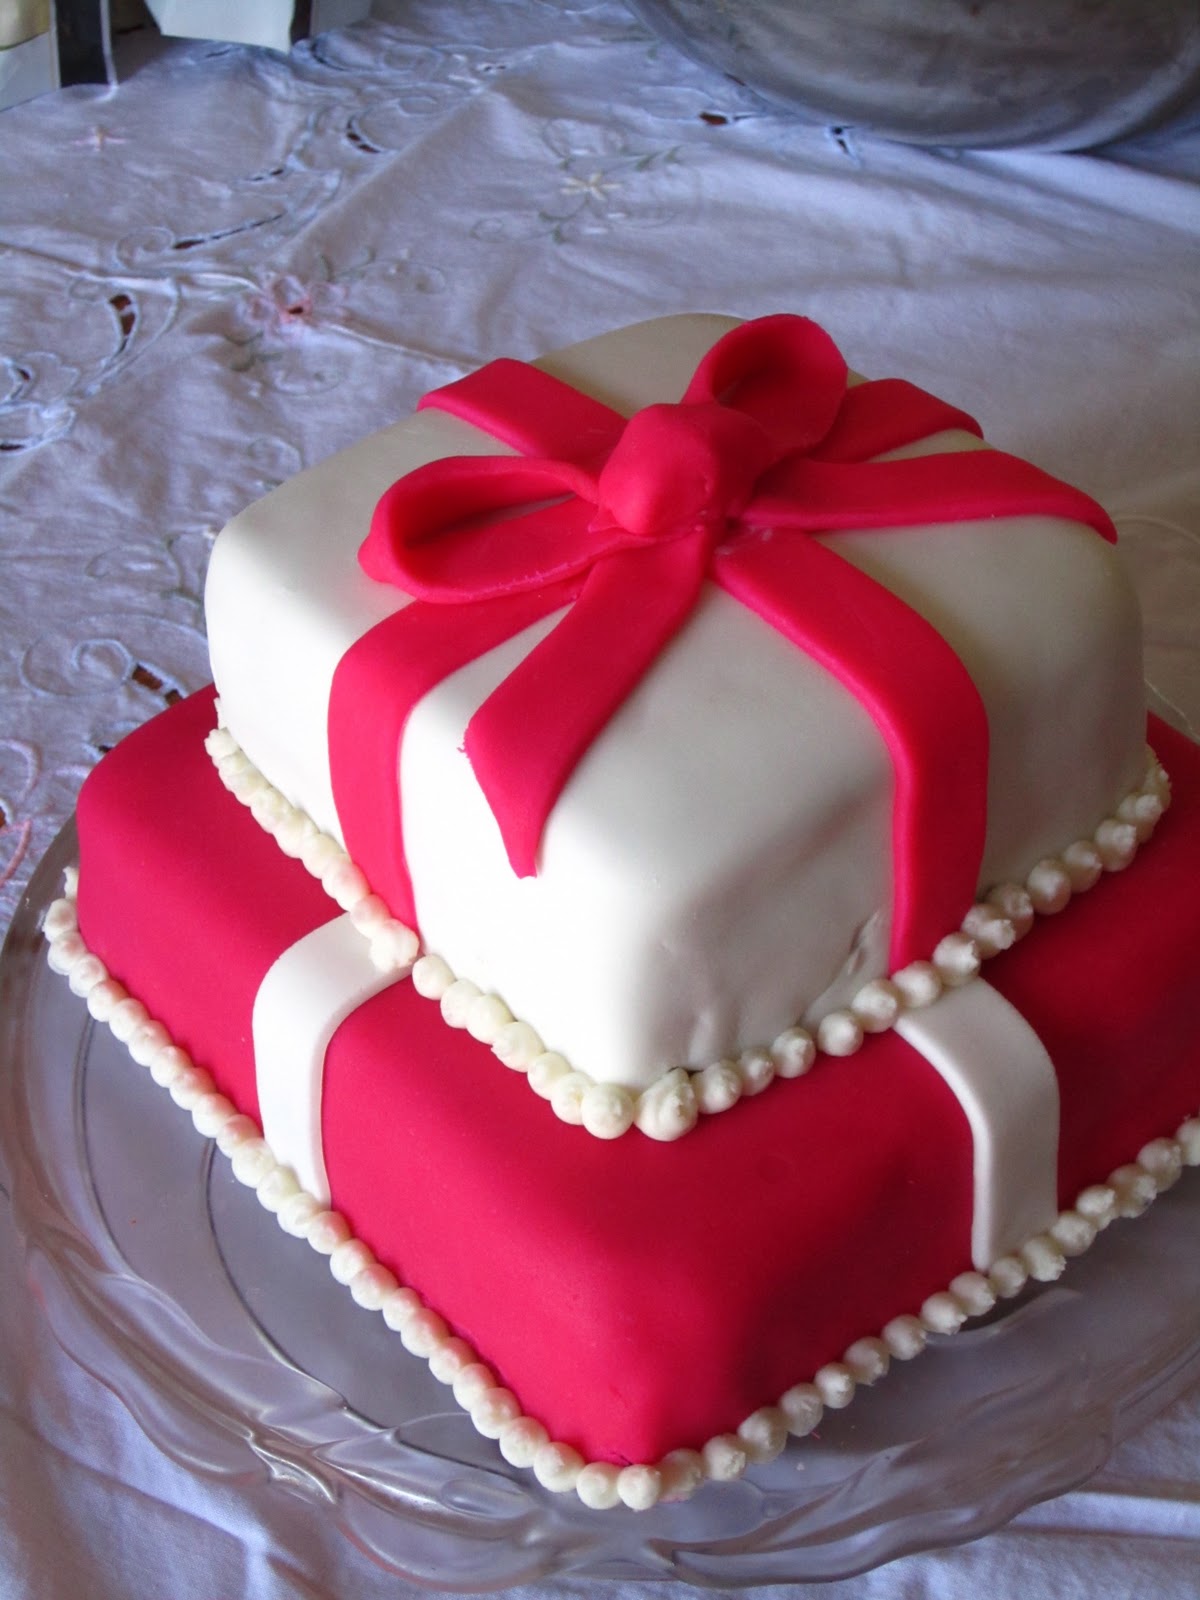
My mom's 50th birthday cake is the reason I started teaching myself cake decorating. I had only used fondant once previously,  and this cake was quite different, and  it was a problem from start to finish.

The cake had to feed 30+ people. It had two 9" square layers (one chocolate, one vanilla), and then two 6" square layers. The layers were separated with butter cream icing, and the cake as a whole was covered with chocolate buttercream. Baking went smoothly but problems came with the icing. First, the chocolate butter cream was too thin to go on properly and just ran everywhere. Not cool. I added icing sugar to the butter cream to thicken it up and things went alright after that.

Next was the fondant. The 9" cake needed a lot of fondant rolled out to cover it.  I used a pink fondant for this portion of the cake. It took several tries to get it rolled out to a size that would cover the whole cake. I'll be buying a roll-and-cut mat before my next venture of this size, that's for sure. Once I finally had the cake covered, trimming the fondant became pretty difficult. The corners were awful to trim and to get the fondant to lay properly.  I managed to muddle my way through the bottom cake without too much issue.
The smaller 6" cake was more complicated. I used a basic white fondant for this portion and again had a hard time with the corners. I wasn't as lucky as I was with the pink fondant, and ended up with a crack near one corner of the cake. Not paying attention, I later positioned the bow so that this would be on the front of the cake. Oops.

Finally, I had intended to make a bow that would have looked something like this. However, it was too humid and the fondant wouldn't harden enough, and the bows collapsed. The ribbons that were around the cake were already in place and attached to the cake, leaving me in quite a pickle because I didn't have much pink fondant left and I needed something quick.

I used some of the scraps that I had left over from the ribbons I'd made to go around the cake (made in no-time with a ribbon cutter and embosser). I hastily formed one piece of the ribbon into a large ball, and created loops that could lay on either side to resemble a more traditional bow.


Once we brought the cake out to my mom, the candles dripped wax all over the place, which took away from the appearance but helped to draw attention away from all the problems in terms of the bow and the cracked fondant. People liked the cake, but it went down in my books as a failure. I'll master that bow one day though, if it's the last thing I do.

Share This!