Showing posts with label fondant. Show all posts

Tuesday, March 27, 2012

Springtime = Caketime

With the exception of the past two days, we've been blessed with gorgeous spring weather recently! Taking that into consideration, I used the spring as a theme in a recent cake I made for a school celebration. The cake was my favourite chocolate cake, the recipe for which you can find here, or on the recipes page with several of my other faves!

What I really wanted to talk about was how simple it was to make this cake, though some of the details look quite intricate. What you'll take away from this post is not only a simple way to make pretty cakes, but also that I'm a bit lazy (well, not lazy per se, but I sure wouldn't take the time to craft each flower on my own).

To start, I covered the cake in chocolate buttercream, and the followed that with a layer of fondant. This was a simple marshmallow fondant made from green mini-marshmallows.

Next, I divided gum paste into three sections, colouring them blue, pink, and brown respectively. I've come to find that gum paste is much nicer to work with than fondant, so I chose it for the decorations as opposed to the fondant that I'd usually used previously.

Now, here's the real trick - gum paste molds. They are quite possibly the easiest thing to use, honestly. There are several different Wilton ones to choose from, and I chose a spring themed one. Simply dust the molds with corn starch (I'm sure icing sugar would work well too) and then push the gum paste into the molds. Carefully remove the gum paste and trim any areas that may need trimming. Voila, easy peasy.

To attach the gum paste, I used a small brush and sum water but you can of course use gum glue. Once the pieces were attached, I painted sugar dust onto the flowers for some extra dimension. The cake was a hit, and I think (despite my protest that it was much easier than it looked) I was given much more credit than necessary for this quick little cake. It really does look like spring in a cake though, and tasted alright too!

For more updates, ideas, and general cake banter subscribe to the blog or visit the Facebook, Twitter, and YouTube pages! Until next time!

Tuesday, February 28, 2012

Taste the Rainbow Cake!

Original challenge photo
 If you've met me, you know that I set pretty high standards for myself. You may or may not also know that I don't like to lose - I'm a little bit competitive and I don't like to say no to a challenge. Having said that, recently a friend posted an image to my personal Facebook wall. There was a simple caption with the image, which read. "Do you accept the challenge?"

I didn't think twice about it. Of course I accepted, informing him that he'd have to eat the cake once I'd made it. This was to be a six-layer, rainbow cake with white fondant and a meme on top. I created the meme in advance using gum paste. I coloured a portion of it black and left the remainder white to create the meme. Once it was ready, it was set aside to harden while I focused on the cake.

I used a basic vanilla cake recipe from Baking With The Cake Boss for this cake. The recipe suggested that it was enough cake batter to make two 9" round layers. Once I had the batter prepared, I divided it equally among 6 different bowls - this was about 3/4 cup of batter per bowl. Once I had the batter divided, I added a little bit of soft gel paste food colouring to each bowl. This was the first time I'd used these food colours and they were great! The colour was extremely vibrant and stayed vibrant once baked.

Once the batter was coloured, I sprayed the 9" cake pans with non-stick spray and then poured in the batter. Since there was very little batter for each colour, the cake layers took significantly less time to bake. I found that each layer only took 12-15 minutes. Because the layers are so thin, you want to be careful not to over bake them or they'll be dry. I started checking each layer around 10 minutes.

While the layers cooled, I prepared a butter cream icing (basic white, to accent the vibrant colours) to use to assemble the cake. As there were so many layers, I used a fine layer of icing between each so as not to have too much. Once the entire cake was iced, I covered the cake in white fondant, and then positioned the pre-made meme on the top.

I was pretty happy with how this cake turned out. Once we cut into it, the inside looked great. This was also much simpler to make than it looked, and was a hit with those who saw it. It would make a great cake for birthdays or other colourful events!

Thursday, February 16, 2012

Soccer Jersey Chocolate Cake

So, about that other cake I made at the end of last week. A few weeks back, a good friend, Mariana (check out her fantastic blog, Gift Favours Under $5), asked me to make a birthday cake featuring the Stoke On The Trent football team's jersey and logo.

This seemed like an easy enough challenge although I was pretty nervous about making a cake for someone outside my family. This was the first time that failure would not be an option and I was feeling the pressure, and for good reason.

I used my favorite chocolate cake recipe for this cake, and it turned out quite nicely except that the chocolate chips in it stuck to the bottom of the pan and it broke coming out. Broke only slightly, but broke nonetheless.

I managed to save the situation by using that broken side of the cake to trim in order to make the sleeves. Crisis averted. For the time being.

Next, my chocolate butter cream was too thick and wouldn't go on smoothly, so I had to thin it out so that I could have a smooth surface.

Next, my fondant was drying out a quite a rapid pace (quicker than usual) and would not cooperate. As if it needed to be more problematic when I'd already fought tooth and nail to get it red.

Finally, I was doing a shell border around the edge of the cake and ran out of white icing with about 3 inches to go and had to make more for that tiny length. By the time I was finished, it looked like a bomb had gone off in my kitchen, with chocolate icing in one corner, vanilla butter cream in another, and the counter covered in scraps of fondant. It took an hour (with the help of my lovely mother) to clean up the mess of icing sugar, fondant, and butter cream that coated just about every surface.

Needless to say, when it was all said and done I was less than satisfied with the results of this cake. Perhaps that was just due to my frustration, I can't be sure. I guess it's true that we are our own harshest critics. Although, I did use gum paste for the first time when making the crest and I can honestly say that I quite enjoyed using it. It's much easier to work with than fondant.

Tuesday, January 24, 2012

Barbie Doll Birthday Cake

One of my best friends and I have known each other since grade 9, and have been through boyfriends, drama, high school, and even university together. In fact, we were roommates for two years. I'd do anything for this gal, and this year for her 22nd birthday, which just passed, what she wanted was a cake. There is a bakery in our home town called Hank's Pastries that makes a dutch cake, which is a sponge cake with vanilla custard filling and butter cream icing. This is the cake that Alisha wanted, and who am I to deny my bestie?
This was the perfect chance for me to use a cake pan I'd been itching to try - the Wonder Mold pan. I had wanted to try it but had no reason to buy it - until now. I knew she'd like it, even if it was a cake more geared towards a 6 year old. Once I bought the pan, and had figured out what the cake would look like, the next, and far more pressing issue, was figuring out a recipe to use. I searched the internet to find recipes that sounded similar to the Dutch cake the Alisha had requested, and even made a practice sponge cake for her to try to make sure I was on the right track.
This has to have been one of the smoothest projects I've done to date. The cake cooked nicely, my custard filling turned out, and the cake decorating even worked out pretty well.
Something to note - the deeper pans require longer cooking times, however you need to keep an eye on the cake and make sure that the top doesn't burn! With it being exposed to the heat so much longer, pay attention that it doesn't get darker than its supposed to.
Once the cake was made, I formed cylinders out of fondant to form the ripples under the skirt of the dress, before laying the pink fondant over the top. There were a few problem areas around the base of the cake because of the ruffles, but they were easily concealed with darker pink fondant ribbon. I also used a star tip to embellish the dress.
The trickiest part of this whole thing may have been attaching the bodice of the dress to the doll. It took me a few tries, but it stayed in place eventually. I love when these things work out!
When the time came to give her the cake, we spent the day cozied under blankets having a Harry Potter marathon and eating cake. Doesn't get much better.

Tuesday, January 17, 2012

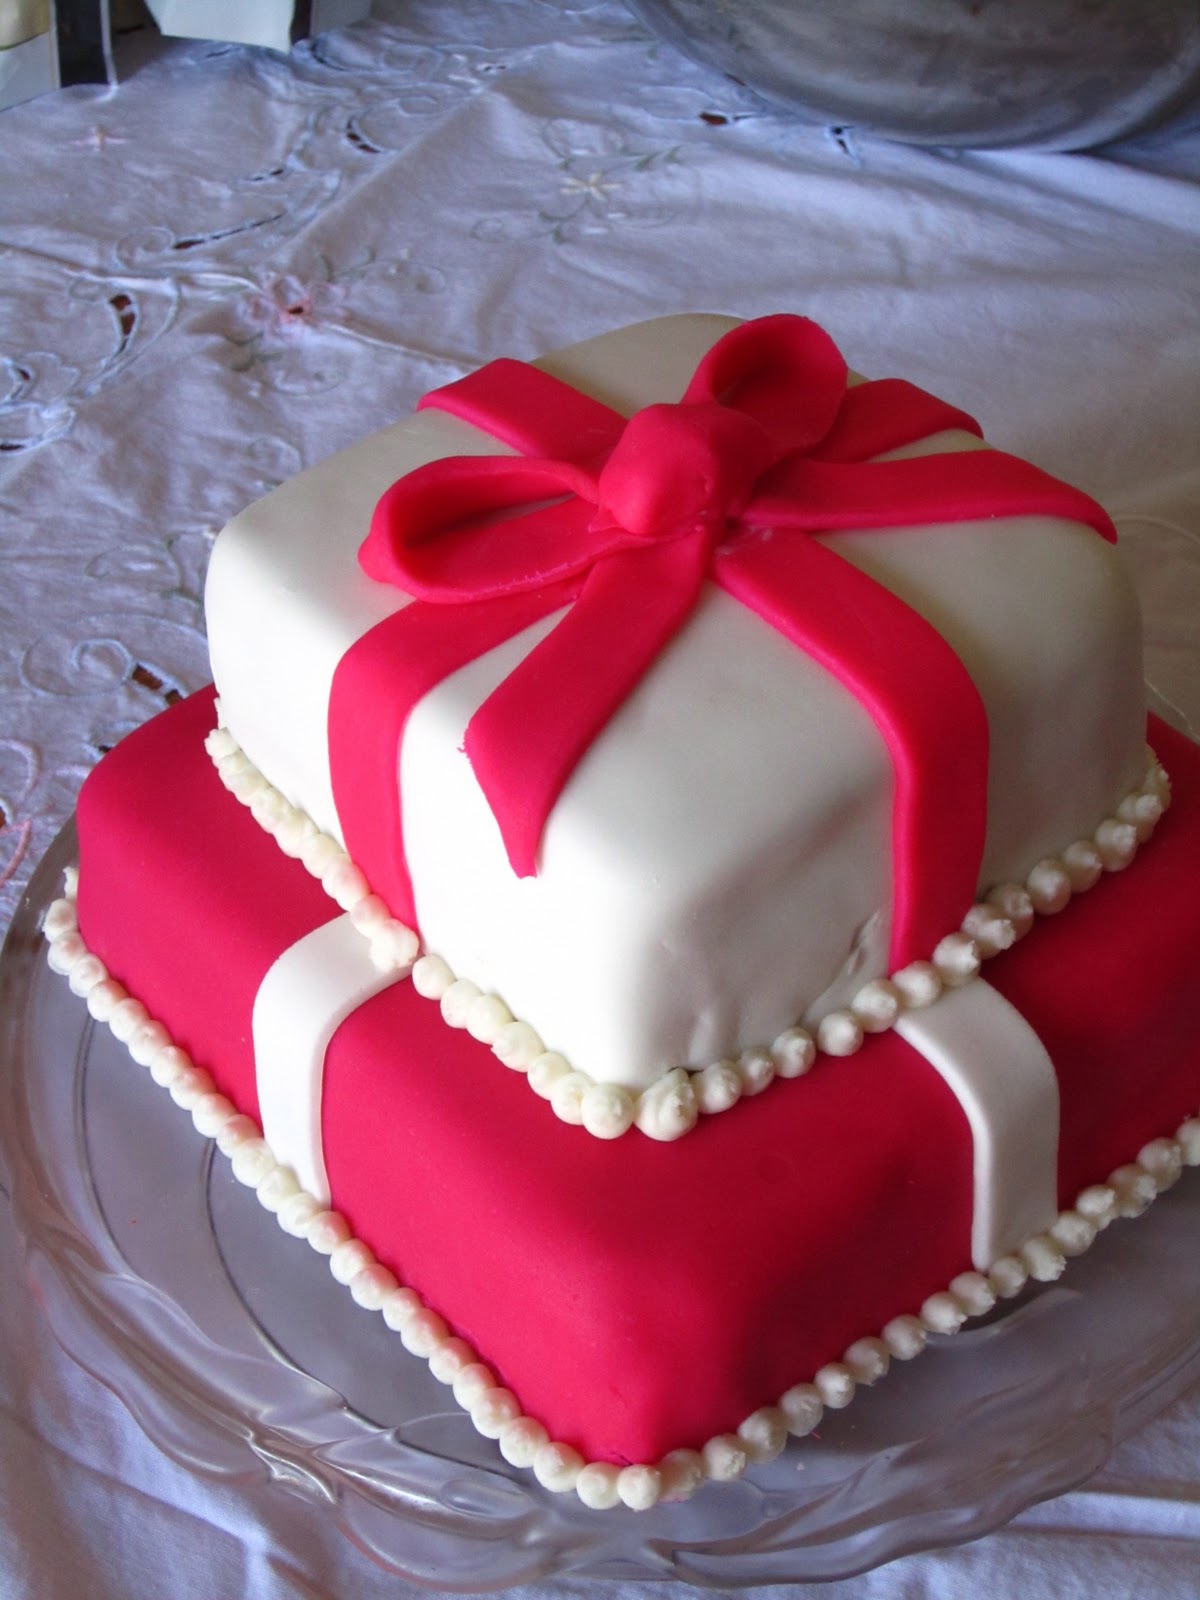
Birthday-Bow Cake

My mom's 50th birthday cake is the reason I started teaching myself cake decorating. I had only used fondant once previously,  and this cake was quite different, and  it was a problem from start to finish.

The cake had to feed 30+ people. It had two 9" square layers (one chocolate, one vanilla), and then two 6" square layers. The layers were separated with butter cream icing, and the cake as a whole was covered with chocolate buttercream. Baking went smoothly but problems came with the icing. First, the chocolate butter cream was too thin to go on properly and just ran everywhere. Not cool. I added icing sugar to the butter cream to thicken it up and things went alright after that.

Next was the fondant. The 9" cake needed a lot of fondant rolled out to cover it.  I used a pink fondant for this portion of the cake. It took several tries to get it rolled out to a size that would cover the whole cake. I'll be buying a roll-and-cut mat before my next venture of this size, that's for sure. Once I finally had the cake covered, trimming the fondant became pretty difficult. The corners were awful to trim and to get the fondant to lay properly.  I managed to muddle my way through the bottom cake without too much issue.
The smaller 6" cake was more complicated. I used a basic white fondant for this portion and again had a hard time with the corners. I wasn't as lucky as I was with the pink fondant, and ended up with a crack near one corner of the cake. Not paying attention, I later positioned the bow so that this would be on the front of the cake. Oops.

Finally, I had intended to make a bow that would have looked something like this. However, it was too humid and the fondant wouldn't harden enough, and the bows collapsed. The ribbons that were around the cake were already in place and attached to the cake, leaving me in quite a pickle because I didn't have much pink fondant left and I needed something quick.

I used some of the scraps that I had left over from the ribbons I'd made to go around the cake (made in no-time with a ribbon cutter and embosser). I hastily formed one piece of the ribbon into a large ball, and created loops that could lay on either side to resemble a more traditional bow.


Once we brought the cake out to my mom, the candles dripped wax all over the place, which took away from the appearance but helped to draw attention away from all the problems in terms of the bow and the cracked fondant. People liked the cake, but it went down in my books as a failure. I'll master that bow one day though, if it's the last thing I do.

Share This!