Showing posts with label vanilla cake. Show all posts

Monday, April 9, 2012

Checkerboard Cake How-To

So, remember that lovely Easter Bunny Cake Topper? I had the cake topper prepared, but I needed a cake for it to top. What I settled on was a checkerboard cake. This was a 3 layer, 9" round cake that, when cut, looks like a checkerboard on the inside. It looks pretty neat, and is much simpler to make than many would care to believe, so today I'd like to share with you how it's done!

The first thing you'll need is cake. I used a simple vanilla cake recipe and then coloured half of it pink, and the other half light yellow, after separating the batter into two separate bowls. You can also use two cake batters, such as vanilla and chocolate, or whatever suits your fancy. Keep in mind, however, that when using two different batters you'll have to pay attention - not every cake has the same baking temperature or baking time, which could be problematic. For simplicity's sake, that is why I chose to simply colour my cake batter. Given that it was for Easter, I thought the pastel colours looked nice together and suited the occasion nicely.

The next thing you'll need is a checkerboard cake pan set. I'm sure that if you can't find one of these handy sets (I found mine at a local Michael's), or if you just don't want to pay for one (I found mine on sale), there is probably a way to do this in some makeshift fashion - I found an alternative to the pan set, which you can see here. Let me know if it works!

Now that you have the batter, and the necessary equipment, what you're going to do next is actually quite simple:

1. Grease cake pans (or flour them, or prepare them in some way so that the cakes don't stick)
2. Place the dividing rings in the first cake pan, and fill the center ring with cake batter. I used pink first, and found it was easiest to fill the pans using a large serving spoon.
3. Fill the middle ring next, holding the divider in place, with the second colour of batter (yellow, in my case).
4. Fill the outer ring with the first colour (pink), still holding the divider in place. Once the third and final ring has been filled, pull the dividing ring out of the cake pan, being sure to lift it straight up so as not to disrupt your cake batter.
5. Rinse the dividing ring thoroughly and dry it, before placing it in the next cake pan. Then, proceed to fill the second cake pan in the same way that  you did the first. Use the same colour pattern, which in my case was pink in the center and outer rings, with yellow in the middle. These two layers, which are now the exact same, will be the top and bottom layers of the cake.
6. For the middle layer of the cake, again rinse the divider and then position it in the third pan. This pan is going to be filled in the opposite way of the first two. In my case, I filled the center with yellow, then proceeded to fill the middle with pink batter, and then the outer ring with yellow batter.
7. Bake and cool the cakes as directed according to the recipes.
8. Level the layers as necessary, and then frost and layer the cake. Begin with one of your two matching layers, as it will be the bottom. Layer icing over the top (I used vanilla buttercream) and then position the opposite cake layer on top. Again, ice the top and then position the third layer.
9. Now, ice the cake as desired, cut, and serve!

When you cut into the cake, you should find that you have achieved a checkerboard appearance! This cake has always been a hit for me, and it can be done in so many ways! Once  you get the hang of the dividing ring, feel free to change up the colours, add more in, change batters, etc! I have made several checkerboard cakes, and a few of my favourites included:

- A vanilla and chocolate checkerboard cake with raspberry buttercream icing
- A chocolate and banana checkerboard cake with cream cheese icing, and
- A vanilla checkerboard cake that I coloured using red, green, and white for christmas

Try out some of your own combinations and please feel free to share them either in the comments below or on the Facebook and Twitter pages! Feel free to subscribe the blog, and enjoy your checkerboard cakes until next time!

Tuesday, March 6, 2012

Basic Butter Cream Recipe

This is the icing I use for the majority of my decorating. In fact, I've used it so often that I've got it memorized now. The amount of milk needed will vary depending on the consistency of icing you're looking for. 

3/4 cup vegetable shortening
3/4 cup butter, softened
2 tsp vanilla
6 cups icing sugar
1/4 - 1/3 cup milk

Cream the shortening and butter together until they're well blended and have achieved a light, creamy texture. Add in the vanilla and beat at a medium speed until well mixed. Add the icing sugar, stopping often to scrape the sides of the bowl with a spatula. Once the icing sugar has been added, the icing will be stiff and dry. Add the milk, a tablespoon at a time, continuing to beat at medium speed. When you have achieved the desired consistency, your icing is ready to use.
For chocolate butter cream, add 4 squares of unsweetened baker's chocolate.

Tuesday, February 28, 2012

Taste the Rainbow Cake!

Original challenge photo
 If you've met me, you know that I set pretty high standards for myself. You may or may not also know that I don't like to lose - I'm a little bit competitive and I don't like to say no to a challenge. Having said that, recently a friend posted an image to my personal Facebook wall. There was a simple caption with the image, which read. "Do you accept the challenge?"

I didn't think twice about it. Of course I accepted, informing him that he'd have to eat the cake once I'd made it. This was to be a six-layer, rainbow cake with white fondant and a meme on top. I created the meme in advance using gum paste. I coloured a portion of it black and left the remainder white to create the meme. Once it was ready, it was set aside to harden while I focused on the cake.

I used a basic vanilla cake recipe from Baking With The Cake Boss for this cake. The recipe suggested that it was enough cake batter to make two 9" round layers. Once I had the batter prepared, I divided it equally among 6 different bowls - this was about 3/4 cup of batter per bowl. Once I had the batter divided, I added a little bit of soft gel paste food colouring to each bowl. This was the first time I'd used these food colours and they were great! The colour was extremely vibrant and stayed vibrant once baked.

Once the batter was coloured, I sprayed the 9" cake pans with non-stick spray and then poured in the batter. Since there was very little batter for each colour, the cake layers took significantly less time to bake. I found that each layer only took 12-15 minutes. Because the layers are so thin, you want to be careful not to over bake them or they'll be dry. I started checking each layer around 10 minutes.

While the layers cooled, I prepared a butter cream icing (basic white, to accent the vibrant colours) to use to assemble the cake. As there were so many layers, I used a fine layer of icing between each so as not to have too much. Once the entire cake was iced, I covered the cake in white fondant, and then positioned the pre-made meme on the top.

I was pretty happy with how this cake turned out. Once we cut into it, the inside looked great. This was also much simpler to make than it looked, and was a hit with those who saw it. It would make a great cake for birthdays or other colourful events!

Monday, February 13, 2012

Hello Kitty Cake

Hi there friends! I hope you all had a fantastic weekend/Valentine's Day (if you've already celebrated it). Maybe you tried out those DIY heart-shaped cupcakes (if so, how did they turn out?).

If your weekend was anything like mine though, it was a whirlwind and flew by without there being enough time. Last week, I had even less time than I did over the weekend, because I took on two cakes in addition to everything else.

The first of these cakes was a Hello Kitty cake that my aunt and uncle requested for my cousin's 5th birthday. It was pretty straight forward - use the Hello Kitty pan to bake the cake and then ice it.
This process went quite smoothly. I used a vanilla cake recipe from Baking With The Cake Boss, and my basic butter cream recipe that I've come to know by heart.

There weren't any problems with this cake (though it did take about 1.5 times longer to bake than the recipe indicated because of the depth of the pan) but I feel the need to let you all in on a secret.

Ready for it?

Using a 16 Star Tip to ice the entire cake takes forever. I honestly spent over two hours just piping the white onto the majority of the cake.

In the end though, I was pretty satisfied with the results. It's not too often (yet) that I get to say that so I'll call this cake a success. Also, though I didn't get a chance to try out the cake, I was told that the recipe was a hit!

Check back in a couple days to hear about my less successful cake encounter that also took place last week!

Tuesday, January 17, 2012

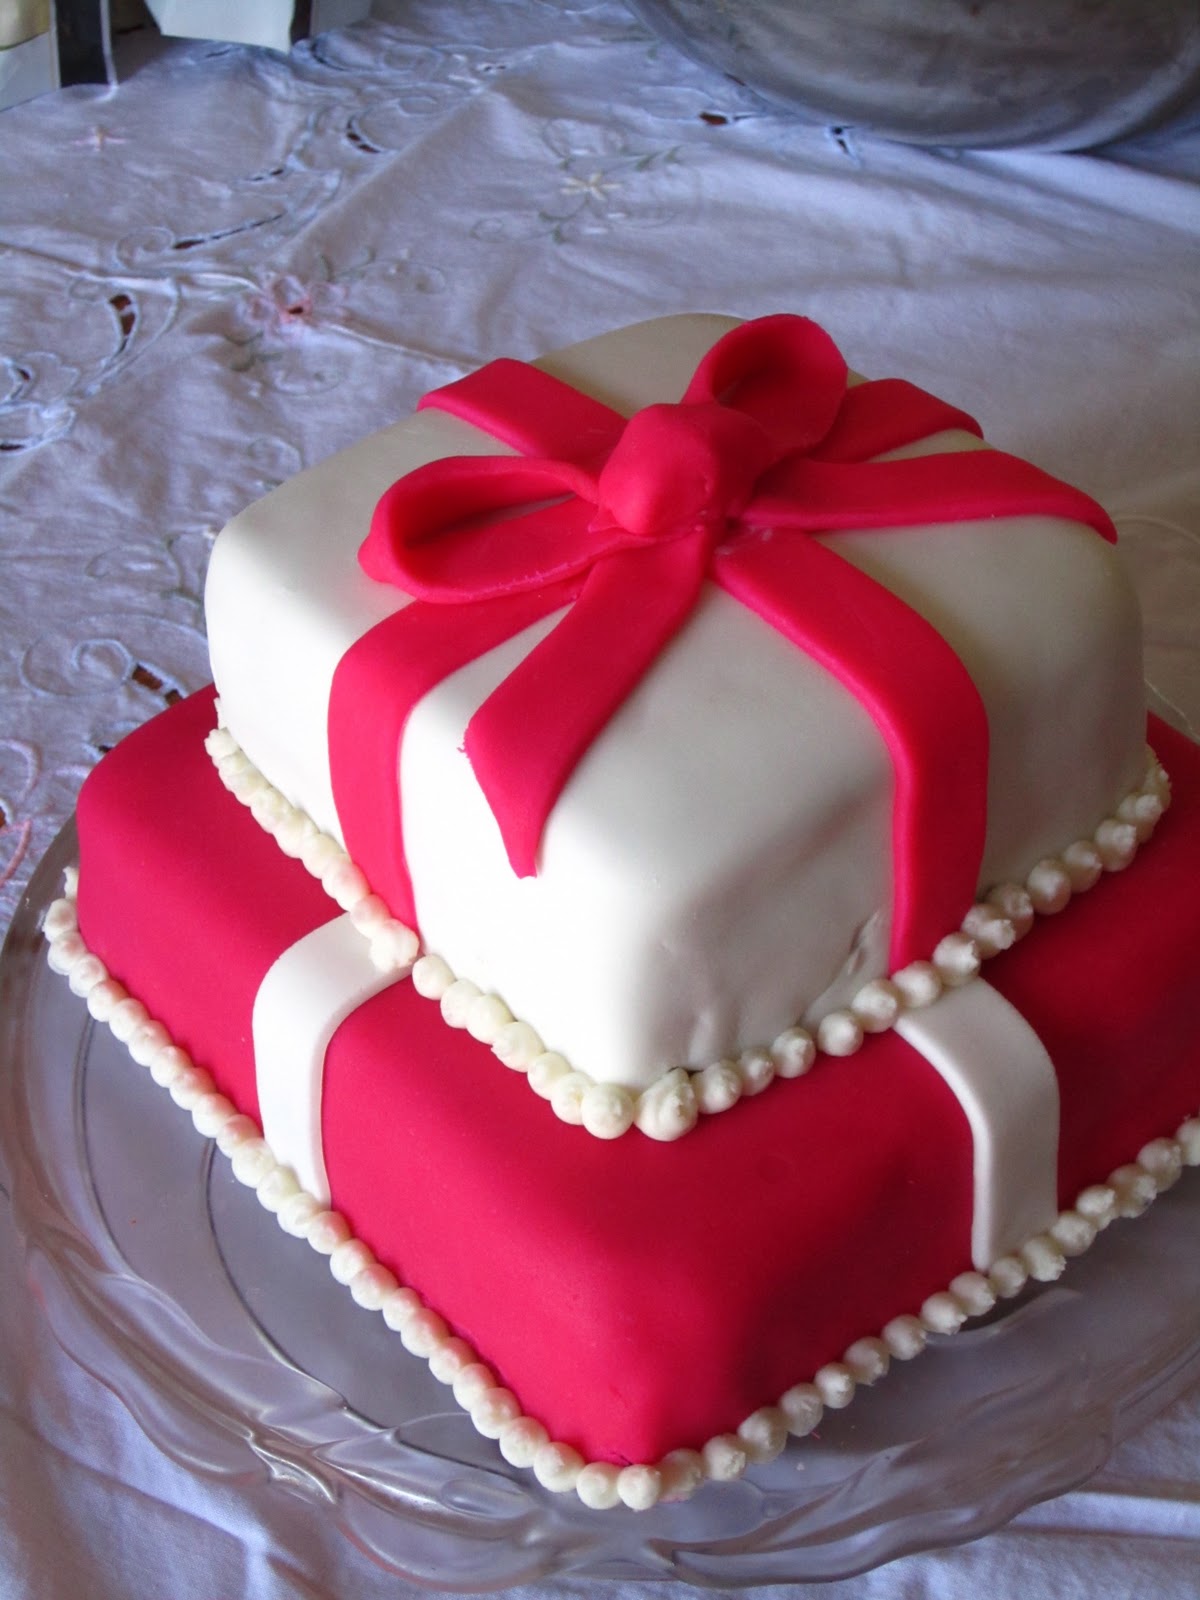
Birthday-Bow Cake

My mom's 50th birthday cake is the reason I started teaching myself cake decorating. I had only used fondant once previously,  and this cake was quite different, and  it was a problem from start to finish.

The cake had to feed 30+ people. It had two 9" square layers (one chocolate, one vanilla), and then two 6" square layers. The layers were separated with butter cream icing, and the cake as a whole was covered with chocolate buttercream. Baking went smoothly but problems came with the icing. First, the chocolate butter cream was too thin to go on properly and just ran everywhere. Not cool. I added icing sugar to the butter cream to thicken it up and things went alright after that.

Next was the fondant. The 9" cake needed a lot of fondant rolled out to cover it.  I used a pink fondant for this portion of the cake. It took several tries to get it rolled out to a size that would cover the whole cake. I'll be buying a roll-and-cut mat before my next venture of this size, that's for sure. Once I finally had the cake covered, trimming the fondant became pretty difficult. The corners were awful to trim and to get the fondant to lay properly.  I managed to muddle my way through the bottom cake without too much issue.
The smaller 6" cake was more complicated. I used a basic white fondant for this portion and again had a hard time with the corners. I wasn't as lucky as I was with the pink fondant, and ended up with a crack near one corner of the cake. Not paying attention, I later positioned the bow so that this would be on the front of the cake. Oops.

Finally, I had intended to make a bow that would have looked something like this. However, it was too humid and the fondant wouldn't harden enough, and the bows collapsed. The ribbons that were around the cake were already in place and attached to the cake, leaving me in quite a pickle because I didn't have much pink fondant left and I needed something quick.

I used some of the scraps that I had left over from the ribbons I'd made to go around the cake (made in no-time with a ribbon cutter and embosser). I hastily formed one piece of the ribbon into a large ball, and created loops that could lay on either side to resemble a more traditional bow.


Once we brought the cake out to my mom, the candles dripped wax all over the place, which took away from the appearance but helped to draw attention away from all the problems in terms of the bow and the cracked fondant. People liked the cake, but it went down in my books as a failure. I'll master that bow one day though, if it's the last thing I do.

Share This!